Friday, December 6, 2019

SkinDx: Machine learning android app for pigmented skin lesion diagnosis with HAM10000 dataset

Summary
SkinDx is an android mobile app for pigmented skin lesion diagnosis. It is standalone machine learning app that uses models trained with HAM10000 dataset for diagnosis prediction without connecting to any server. The app can acheive 76.7% in accuracy.

Background
HAM10000 is a dermatoscopic image dataset for machine learning. It is created by Philipp Tschandl and others in 2018. Its aim is to solve the problem of small size and lack of diversity of available dataset of dermatoscopic images. There are 10,015  rows in the CSV file of this dataset. Each row describes a patient episode of skin disease, and each column describes an attribute eg. age, sex, localization, diagnosis and image file name of skin lesion. This dataset also contains 10,015 image files of related skin lesion.

The diagnosis is categorized into 7 groups: (1) actinic keratoses and intraepithelial carcinoma/bowen's disease (akiec), (2) basal cell carcinoma (bcc), (3) benign keratosis-like lesions (solar lentigines/seborrheic keratoses and lichen-planus like keratoses) (bkl), (4) dermatofibroma (df), (5) melanoma (mel), (6) melanocytic nevi (nv) and (7) vascular lesions (angiomas, angiokeratomas, pyogenic granulomas and hemorrhage) (vasc). The information from this dataset is used for developing android mobile app for diagnosis prediction of pigmented skin lesion.

Methods
1. HAM10000 dataset is checked for missing values and drop them out and then the remaining data is randomly divided into training and testing groups with ratio 80:20.
2.The trained model for classifying lesion image is firstly developed and tested by using transfer training from Mobilenet model.
3. The trained model from above is used to convert lesion image data into new 7 attribute columns in CSV file.
4. One-Hot encoding is used to convert categorical data.
5. The second trained model for diagnosis prediction is then developed and tested.
6. Both trained model are converted to Tensorflow lite model and are used for Android app development.

Results


The app is tested on android mobile device  with 1,992 unseen testing cases for 1st order prediction. The results are as follow:

Accuracy: 76.7% (1527/1992).


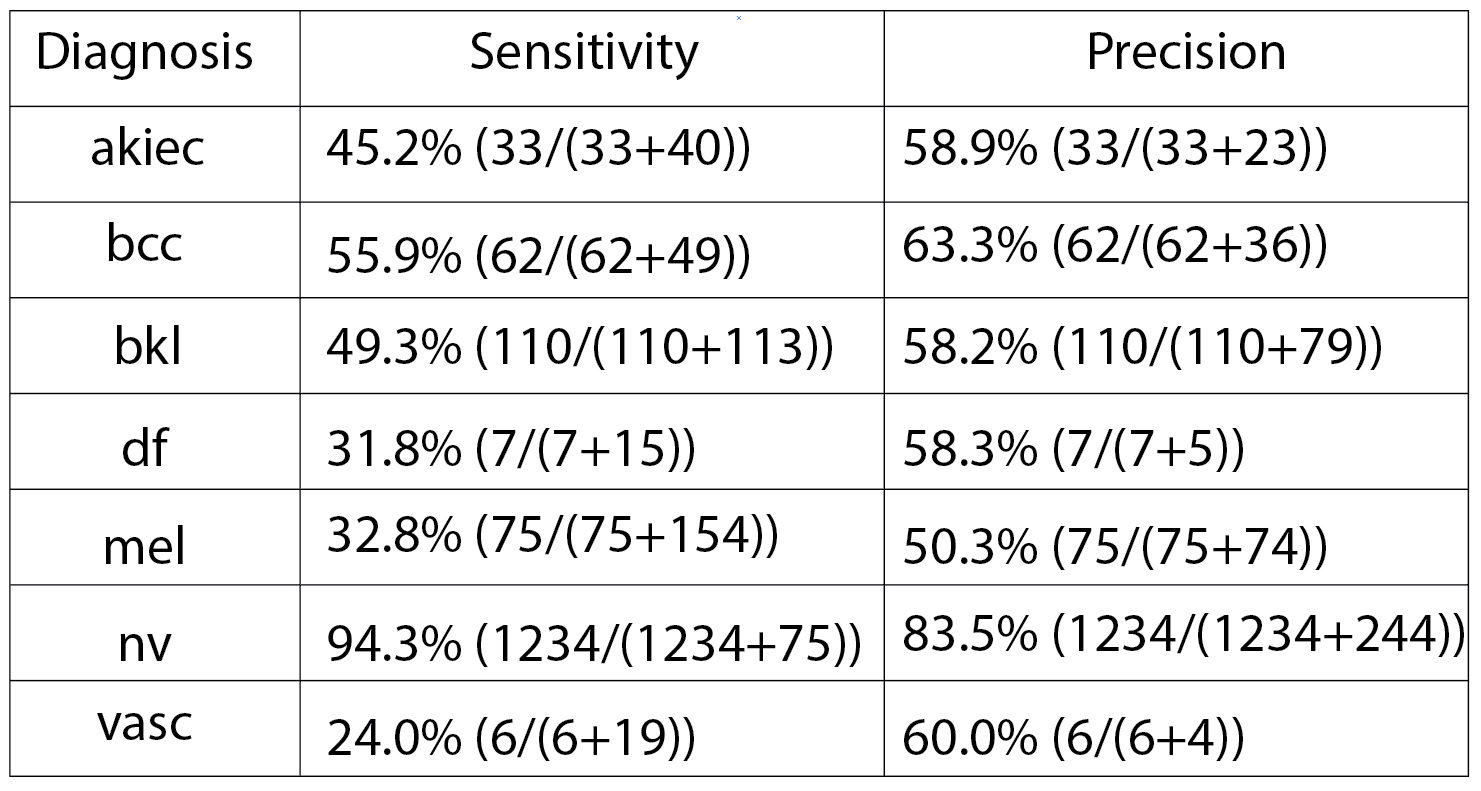
*Accuracy: correct prediction / all cases
*Sensitivity: TP / (TP + FN) *Precision: TP / (TP + FP)
*TP: True positive *FP: False positive *FN: False negative 

Discussion
1. Practical use of this app depends mainly on precision score for each diagnostic group. For example if the app predicts that the skin lesion is melanoma, there is a chance of 50.3% to be correct.
2. If using only lesion image without age, sex and localization data, only 69.7% in accuracy can be achieved.

Reference
Tschandl, P., Rosendahl, C. & Kittler, H. The HAM10000 dataset, a large collection of multi-source dermatoscopic images of common pigmented skin lesions. Sci. Data 5, 180161 doi:10.1038/sdata.2018.161 (2018).

Get it on Google Play

Monday, June 4, 2018

Project scheduling with Monte Carlo simulation on mobile

Background
Uncertainty is a common situation in project scheduling. It happens because we lack 
experience from doing some activities before or have some uncontrollable factors on 
the project. The classic technique we normally use is PERT (Program Evaluation and 
Review Technique). But there are some drawbacks with this technique especially when 
project has activities which are nearly equal in duration and also run in parallel. Nowadays 
the technique that should be used is Monte Carlo simulation. However using simulation 
requires at least desktop computer for constructing network model and experimenting 
with it. Microsoft Project can help us constructing network model. But we need  another 
special software for performing simulation with Microsoft Excel, e.g., RiskAMP, @Risk
or without Microsoft Excel, e.g., Full Monte. In this article we will show you the way easier 
by using AlmanacSoft SchemeSim app. Only one app for doing all these steps and also 
on mobile device.


What is AlmanacSoft SchemeSim (ASS)
ASS is android app that performs Monte Carlo simulation for project scheduling. It answers 
three important questions: firstly, when project will be completed, secondly, when each 
activity will start and end, and finally, the critical probability for each activity in the project. 
ASS automatically creates network model and do simulation within one step and produces 
scheduling report as an output. ASS supports two types of random generating for activity 
durations: Triangular and Pert distribution. It detects how many CPU core the mobile has 
and uses all of them for parallel native simulation. That is necessary because mobile has 
limited resource. To perform simulation efficiently needs high performance computing by 
creating native (binary) code and run it in concurrency. ASS also supports calendar time 
and working day and time. That means we can specify which day in a week we actually 
work, e.g., Monday to Friday,  and in which time interval, e.g., 8:30 - 16:30.

ASS overview and installation
ASS can be download and install from google play store. ASS offers in-app purchases. 
That means by default this app is in basic edition and can be upgraded to professional 
edition by paying subscription fee. In basic edition it can work for free with project not 
more than five activities. You also have a free trial period for 30 days after upgrading to 
professional edition. During this trial period, if you don’t satisfy with it you can cancel 
subscription with no charge.


When you open the app you will see this following screen. This is the Input page for 
type in your project data. 


There are other two pages, e.g., Report and About, you can navigate to them when you tap on three line menu. After simulation has finished, report will be generated in Report page.


 Project data preparation

You have to prepare project data as table above before inputing. In this case our project consists of 5 activities. We estimate activity duration by using three-point estimating (a = the best-case, 
b = the worst-case, m = the most likely) which a <= m <= b. We also analyze for predecessor of each activity.

Entering data

Type in number of activities (5) and click add button.

If you type wrong, you can check the box on the right upper side of each activity and click remove button, If you want to add more activities, you can do it again as many as you want. Type in activity name, distribution, a, b, m and predecessor. For distribution you can choose Triangular or Pert distribution. If you have no experience of this activity before, choose Triangular is better. But if you have it,  Pert distribution is better. If you have predecessor more than one activities, type activity name separated by comma with no space.

Now select project start date and time by click the right button. If you don't select it will use current date & time as a project starting point. In this case I choose 1 October this year and at 9 AM.
For confidence level, I choose 99% and use 100,000 iterations for simulation.


Simulation and report generation
You can save input file by click on three dot menu and select save input file for later use. Now it is time to perform simulation, click on the pink button and click run.


This project will take 20.258 days with confidence level 99% and will be finished on Sun, 21 October 2018 at 11:29. There are also detail of starting and ending date&time for each activity. Activity d is the most critical with probability 97.604% and the lowest critical is activity e which is 2.396%. You can see that we use just only 2.07 seconds for 100,000 iterations.

Tuesday, March 28, 2017

Asio ThreadPool Performance Test

Updated: 7 April 2017

Category: C++, Concurrency Programming, Thread pool, Asio

I have tested Asio ThreadPool performance by comparing processing time of three concurrency methods. The first method is Standard C++ Multithreading (mthread), the second is Asio ThreadPool (asio) and the last is Microsoft Parallel Patterns Library (ppl). All of them were used for calculating PI and Fibonacci numbers on the same machine for both Windows and Linux. They all used the same code except for PPL that is only available on Windows. I have also measured serial processing times for baseline comparison. The C++ compilers used are MSVC 19.10.25017 for Windows, GCC 6.3.1 and Clang 3.9.1 for Linux. The results are as follow:


Comparing time used between MSVC, GCC and Clang


GCC is the fastest in all scenarios (not including ppl). The second is MSVC except for fibonacci with asio that Clang comes the second.
 

Comparing each concurrency method with serial processing


Using MSVC
There is no big difference in time used for PI among mthread, asio and ppl. However for Fabonacci, mthread and ppl approximately process at the same speed and faster than asio which is the slowest.


Using GCC
There is no big difference between mthread and asio in time used for PI. But for Fabonacci, mthread has a little bit faster than asio.


Using Clang
There is no big difference between mthread and asio for both PI and Fibonacci.


Conclusions
  • The concurrency processing speed depends mainly on three factors: compiler, computational type and concurrency method respectively. 
  • Asio ThreadPool does not perform well with MSVC on some computational type (Fibonacci) when comparing with GCC and Clang.
The code is here.


Saturday, March 4, 2017

Using Asio C++ library based ThreadPool class

Category: C++, Concurrency Programming, Thread pool, Asio

Prerequisites: C++, Asio C++ programming concept, Multithreading

Requirement: Asio C++ library

What is it?
It is only a C++ header file that defines ThreadPool class based on Asio C++ Library.

Why is it created?
It is created to serve the following purposes:
  1. To use C++ multithreading with thread pool.
  2. To use task based concurrency programming.
  3. Can use strictly sequential invocation of handlers.
  4. Can use C++ Exception handling.

How can you use it?
  1. Create the client class that will use thread pool.
  2. Create any tasks that you want to execute in sequential or parallel order. In our case we use sequential for simplicity.
  3. If you want to handle exception. Modify previous code, add final task to start and stop MainIoService as shown in the following code.
  4. In the main code, create ThreadPool instance. Then create client instance by using shared_ptr. Make a call from the client and try to throw an exception in the client code to test exception handling.
  5. If you use _threadPool.strand() instead of _threadPool.enqueue(), any tasks called can not be executed concurrently.
How to dowload the ThreadPool Class?
The ThreadPool Class is in ThreadPool.h header file on github.


Thursday, September 12, 2013

Introduction to AlmanacSoft Payer 1.0

Category: Windows Store app, PayPal, REST API, eCommerce

What is AlmanacSoft Payer 1.0?

AlmanacSoft Payer 1.0 is Windows Store app running on Windows 8.1 Preview or later. It is payment app that uses new PayPal's REST APIs with standards-based technologies such as OAuth and JSON for paying money on the Internet. It supports both Direct Credit Card Payment and PayPal Account Payment. The app is native code written in C++/CX and developed by Poom Malakul Na Ayudhya.


How to Install
  1. Download AlmanacSoft Payer 1.0 and you will get the file named "Payer_1.0.0.0_Win32_Test.zip".
  2. Extract it and right click on "Add-AppDevPackage.ps1" to Run with PowerShell. 
  3.  You may be asked to acquire the developer license if you don't have it yet. Use your Microsoft  account to log in and get the license for free. It will be expired in one month and you can renew it.
  4. You may be asked for Execution Policy Change, you have to answer "[Y] Yes"
  5. You may be asked for installing the signing certificate, you have to answer "[Y] Yes". 
  6. AlmanacSoft Payer will be installed successfully.

How to use

For Merchants
  1. You have to register at PayPal for PayPal merchant account.
  2. Log in at https://developer.paypal.com/ with your merchant account. Then create an application to get merchant's Client Id and Secret.
  3. Run AlmanacSoft Payer and select credentials page. Use your Client ID and Secret to apply and export your encrypted merchant data file (MDF).
  4. Send encrypted MDF to your customers by e-mail or let them download from your website.
  5. Tell your customers to use AlmanacSoft Payer to import or download your MDF and use it to make payment for you.
For Customers
  1. Run AlmanacSoft Payer. If you are behind proxy server, set your proxy credentials first.
  2. Using AlmanacSoft Payer to import or download encrypted MDF provided by the merchant you want to pay.
  3. Select appropriate payment method for merchant in the countries supported by PayPal.

Wednesday, March 27, 2013

C++ AMP: How fast is it?

Category: Windows Store app, C++ AMP, GPU Programming
Prerequisites: C++, C++ AMP

Full Text in Thai (PDF 1.13 MB)

This study measures time used in millisecond for calculating square matrix multiplication at different dimension sizes starting from 256x256 to 2048x2048. The C++ AMP tested engines are two GPUs (Intel HD Graphics 4000 and NVIDIA Geforce GT-650M) and one software engine (Microsoft Basic Render Driver).  Two C++ AMP methods (simple and tiling) are used.  The study also measures time used by normal sequential code for using as a baseline comparison. The testing software is C++ Windows Store app running on Intel i7 RAM 8 MB.


The figure above shows Windows Store app used in this study. It also has 3D rotating cube in background for testing with DirectX.


This is the result table of time used measured in milliseconds. The table also shows computed ratio (in red) comparing between MS Basic Render Driver and Sequential code and also between both GPUs and MS Basic Render Driver. The size means the matrix dimension starting from 256x256 to 2048x2048.


From the above figure, MS Render Driver speed is around five to ten times comparing with sequential code when using simple method and five to twenty times when using tile method.


When using simple method, NVIDIA's speed is ten to thirty times comparing with MS Render Driver while Intel's speed is around five times comparing with MS Render Driver.


When using tile method, NVIDIA's speed is from fifteen to twenty five times comparing with MS Render Driver while Intel's speed is around five times comparing with MS Render Driver.


Friday, February 15, 2013

Run-time Data Binding

Category: Windows Store App Developing
Prerequisites: XAML, C++, C++/CX, Simple Data Binding

Data binding lets you synchronise UI control elements in XAML with data source that can be dataset, data object or any primitive data types. Usually you just set binding property for any UI control elements and then set BindableAttribute attribute for the ref class in the code behind. And when you compile your code, the compiler will do the rest and all properties in your class will be bindable.

The Problem
Sometimes you may need data class that uses dynamic properties. That means you don’t know at compile time what and how many data properties and types the class should have. This is a common situation such as when you retrieve data set from the SQL server that you usually specify data fields at run time. In these cases, BindableAttribute attribute doesn't help.

The Solution
My solution is to implement ICustomPropertyProvider for the ref class. In this article I call this technique as Run-time Data Binding. The steps are as follows:

1. First, create new ref class with inheriting and implementing ICustomProperty. This class will be used for representing run-time property you will create later.

2. Create another new ref class with inheriting and implementing ICustomPropertyProvider. If you want to be notified when your property changed you can also inherit and implement INotifyPropertyChanged here. Don't forget to inherit from DependencyObject, this is mandatory.


In this class I used Map Collection to store my CustomProperty objects and created two public methods for getting and setting value for CustomProperty target.


Now you will have two ref class that can be used for run-time data binding.

3. Create new ref class to be used for run-time binding which inherit from CustomPropertyProvider ref class. In this case I'll create Person Class that will have name property created at run-time.


4. Insert name property at rum-time.